Archive for the ‘Whitepapers’ Category
Install an assembly to GAC
What is GAC?
GAC (a.k.a Global Assembly Cache), is the place where you install your assembly and make it available to all the applications on your machine. In the GAC, you can maintain different versions of your assemblies and have different applications refer to different or same versions of your assemblies.
When you want to consider GAC as your best option?
When you have multiple applications referring to a common assembly (.dll), and you do not want to ‘Add a Reference’ to that assembly (in all of your projects manually everytime) – that is the time you would want to consider installing your assembly to ‘Global Assembly Cache’ (or GAC). By installing your assembly to GAC, you are making your assembly available to all the applications on your machine, thereby avoiding the pain to refer to them manually.
How to install an assembly to GAC?
It is really simple and easy process! It takes only few steps and minutes to install your assembly to GAC and configure your applications to access that assembly. Lets take a look with a simple example.
Client-Side State Management in Asp.Net
ASP.Net is a stateless connection. The pages gets recreated every time the page is posted back to the server. In order to maintain the changes done by the user, asp.net has different state management techniques.
ASP.Net supports Client-side and Server-side State Management options as listed below. In this article we will see client-side management techniques.
Client-side State Management
In this approach, the state information is stored on the client’s computer/browser in the form of a URL, Cookies or as Hidden Fields in the webpage. Client side approach is scalable as it stores data on multiple servers i.e. each users information on their own system. There is no need for the server Read the rest of this entry »
Update IIS Settings using Script
Introduction
Internet Information Services (IIS) is a widely used Internet Services Platform for Microsoft Web Applications. The Web Applications are hosted on IIS by creating websites/virtual directories and/or application pools. Various settings need to be configured before and after the application is deployed on IIS. Some of the important settings are TCP Port, SSL Port, Connection Timeout, IIS log files properties, application pool settings and others.
Most of us configure these settings by going to the IIS Manager (start->Run->inetmgr) which everyone would be already aware of. But there is another approach to update the IIS Settings and that is Read the rest of this entry »
Message Queuing – MSMQ
MSMQ is a wonderful, easy and powerful methods by which messages can be stored and retrieved from an independent location. This store is unlike databases or a file server where objects can be sent and received independently. This article explains the basics of installing and configuring MSMQ followed by message send and recieve process using an example. MSMQ is further vast in itself. At the end of this article reference sites are available for more information on MSMQ.
What is MSMQ? How it works?
MSMQ is a message queuing system that enables applications to send and receive messages (objects). It is a seperate independent location where messages are stored and retrieved by applications. Read the rest of this entry »
Debugging and its techniques in .Net
Debugging is one of the most important aspects of developing quality code. It helps a developer to analyze the code at various points. Use of effective debugging techniques helps better understanding and fast analysis of the code thereby increasing the productivity.
Debugging often involves verification of the code, analysis of the code functionality when a bug is reported, or understanding of a pre-written code.
It is really very useful to understand the strong debugging techniques that .net language and IDE provides. Let us see some good debugging techniques available.
1. F9, F5, F10, F11 – Most of us are already familiar with these Hot Keys.
F9 – Used to set up breakpoint.
F5 – Starts the debugging.
F10 – Step Over.
F11 – Step into.
Shift + F11 – Step Out.
These options are available in the Debug menu of IDE.
2. Debug Windows: Following windows will be useful to look at for analyzing various output results. I am not going into details to explain these windows as this is out of scope of this article.
Output, locals, watch, call stack, Immediate.
3. Debugger and Debug Class available in system.diagnostics namespace. These are coding approaches of debugging in .net.
Debugger:
Has some important methods useful for debugging like Break() and Log().
Break() is similar to the breakpoint that we put using F9 Hot Key. But using this approach, we can make it conditional.
using System;
using System.Collections.Generic;
using System.Diagnostics;
using System.Linq;
using System.Text;namespace ConsoleApplication2
{
class Program
{
static void Main(string[] args)
{
int result = division(1, 2);
if (result == 0)
{
Debugger.Break();
}
}static private int division(int num1, int num2)
{
return num1 / num2;
}
}
}
In the above example, if the result is non-zero, the debugger will not get activated.
Log() method is used to log the data to the attached debugger. The below example prints the output to the output window.
using System;
using System.Collections.Generic;
using System.Diagnostics;
using System.Linq;
using System.Text;namespace ConsoleApplication2
{
class Program
{
static void Main(string[] args)
{
int num1 = 1;
int num2 = 2;
int result = division(num1, num2);
if (result == 0)
{
Debug.Listeners.Clear();
DefaultTraceListener _dtl = new DefaultTraceListener();
Debug.Listeners.Add(_dtl);
Debugger.Log(2, “Zero Result”, string.Format(“The result of {0}/{1} is zero”, num1, num2));
}
}static private int division(int num1, int num2)
{
return num1 / num2;
}
}
}
There are many other Listener classes available in .net. Best bet would be MSDN for reference.
Debug:
The Debug class has several important and useful methods to help efficient debugging. Let’s look at them.
Assert() – Pops up a message box if the assert condition fails.
static void Main(string[] args)
{
int num1 = 1;
int num2 = 2;Debug.Assert(num1 > num2, “Num1 is less than Num2”);
int result = division(num1, num2);
}
the user gets the message box as below with the message shown at the top followed by the stack trace.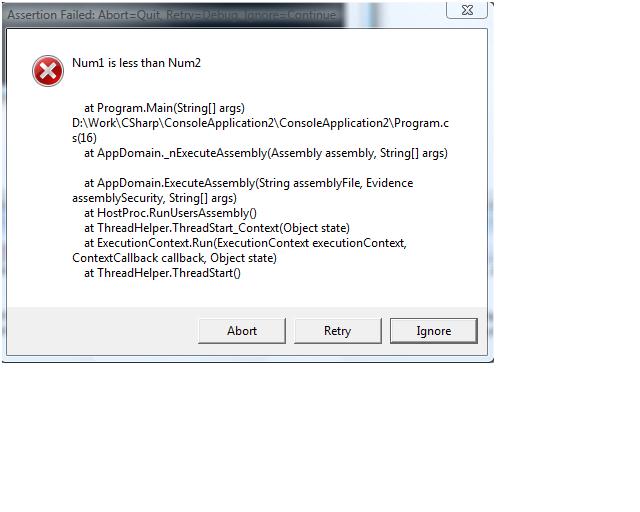
Fail() – The fail method is similar to the Assert() method. Except that it does not evaluates the condition. It simply breaks at the Debug.Fail() line with the message & stack trace in the message box.
Write(), WriteIf() – Writes the output to the output window or any attached trace listener.
The only difference between Write() & WriteIf() is that WriteIf() is executed only if the specific condition is met.
Debug.Listeners.Clear();
DefaultTraceListener _dtl = new DefaultTraceListener();
_dtl.LogFileName = @”d:\logging.txt”;
Debug.Listeners.Add(_dtl);
Debug.AutoFlush = true;
Debug.Write(“Message from debug.write method”);
Debug.WriteIf(num1 > num2, “Check the numbers”);
Note, the issue with these methods is that they write the next output in the same line. To solve this problem we have Debug.WriteLine() & Debug.WriteLineIf() methods.
WriteLine(), WriteLineIf() – They do the same thing as Write() and WriteLineIf() except that they write the output to the attached listener in the new line.
Debug.Listeners.Clear();
DefaultTraceListener _dtl = new DefaultTraceListener();
_dtl.LogFileName = @”d:\logging.txt”;
Debug.Listeners.Add(_dtl);
Debug.AutoFlush = true;
Debug.WriteLine(“Message from debug.write method”);
Debug.WriteLineIf(num1 > num2, “Check the numbers”);
These are some of the useful methods you can perform good debugging. There are more useful methods available. I suggest MSDN as the best reference to research.
Also note, the above Debugger or Debug methods will work only if you run your program in the Debug mode. In release mode they act like disabled pieces. That’s the advantage of using these for debugging.
4. Debugging Attributes
Other than these powerful debugging methods, there are various debugging attributes available to ease the debugging output readability.
The attributes that are commonly used are DebuggerDiplay & DebuggerBrowsable.
I won’t get too much into details for this for the sake of brevity. Refer this like for its details MSDN
5. Trace Class
Trace is also a part of System.Diagnostics namespace. Trace class works in line with the Debug Class. Their methods are pretty much similar to that of debug class. They use TraceListeners instead of DebugListeners to print the trace output.
The only differences between Trace and Debug classes are:
Trace statements work both in Release and Debug mode whereas Debug statements works only in Debug mode.
Both trace and debug classes are used to understand the behavior of the application program. The main purpose of the trace is to understand the program flow execution whereas debug class purpose is to find out why a particular error occurs.
Happy Debugging!
Creating Windows Service – C#
Creating a windows service is not a big deal. But as most people don’t often create windows service they tend to do some silly mistakes when they have to create one. Hence I thought of writing up a sample code demonstrating its basics.
Steps:
a. Create a new Windows Service Project. Go to File -> New -> Project and Read the rest of this entry »
